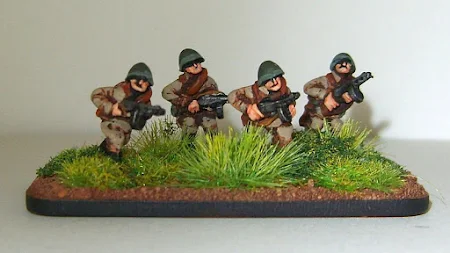
Whilst at Phalanx I decided to buy some painted 15 mm Russian figures from the bring and buy. I bought painted figures because I want to experiment with my basing technique and use some Stilfor tufts as I'd read so much about them.
So I bought 25 figures and some 2 & 4 mm plain spring tufts. After a few hours work this is a sample of what I'd achieved:

Not the best picture in the world but you get the idea. Of course it's never that simple so the rest of this post covers what I leant.
Groundwork
The texturing went well using my new "almost no paint" method:
- Coat base with PVA.
- Add a few pieces of aquarium gravel.
- Cover remainder with sand and leave to dry for 1 hour.
- Second coat of PVA.
- Sprinkle with medium talus (5 to 10% coverage).
- Cover remainder with sand and leave to dry overnight.
- Paint gravel dark grey and dry bush with light grey then white.
- Wash sand with burnt sienna watercolour wash.
- Leave to dry for at least 2 hours.
- Dry brush sand with VMC 843 Cork Brown.
- Touch up the base edge where necessary.
The two thin coats of sand are necessary because the bases on the Battlefront figures are very thick. The watercolour wash is much easier to apply than paint as capillary action wicks the solution into the sand and it always dries flat.
Watercolour Wash
If you want to make your own wash it's really easy. Just mix tube watercolour and water in a small jar with some stirring beads. This produces a great wash but it needs to to shaken well before use.
Flora
So far so good. The next bit was adding the tufts etc. As I was experimenting I started with a few tufts and small patches of scatter as it's always easier to add than it is to remove.
Adding tufts using tweezers and PVA was very straight forward; no wonder people like using them. I started with 2 or 3, 4 mm tufts per base. Aesthetically, this wasn't enough so I added some 2 mm tufts. This looked better but still artificial. Then I added some patches of regular static grass to roughen the edges of the clumps.
At this point I had plain green tufts and a mixed green/yellow static grass. The contrast was too stark so I dry brushed the tufts with VMC 953 Flat Yellow to tie everything together. The tufts dry brushed really easily. At first I tried dry brushing with a pale cream first but that looked wrong.
I put the bases away and returned to them the next day. With "fresh eyes" I felt the varying heights worked well but the, now consistent, colour of the tufts and static grass looked bland and therefore artificial.
To resolve this I added patches of dark green foam scatter (I can't remember where I got it from) to provide some contrast. As before the initial contrast was too strong so I dry brushed the darker patches with VMC 891 Intermediate Green (to add depth) and VMC 015 to tie everything together.
In future I should be able to do this much more quickly as there'll be a lot
less experimentation. I think the method will be:
- 4 mm spring green tufts (2-3 per base)
- 2 mm tufts (but only because I need to use them up).
- Dark green foam scatter.
- Regular static grass.
- Leave to dry.
- Dry brush dark green scatter with VMC 891.
- Dry brush all foliage with VMC 015.
Closing remarks
Finally, if you wondered about the title of this post it's a pun based on a cartoon character used to promote road safety in the UK from 1953 onwards. If you got the joke then you too are of a certain age.
.png)

1 comment :
Link to TMP comments
Post a Comment