.png)
I have been flagging recently. That is putting flags on to 15 mm flag poles. So I thought I'd put together a post on my current method.

It is quite a lengthy post. That's because there's a lot to bear in mind. Plus I wanted to explain more than few tips & tweaks so that it would be useful to complete beginners.
Sadly, there are no pictures of some steps because I don't have the number of hands required.
Laser printed flags
- Increasingly I tend to draw my own flags using clip art from the internet.
- I always get them laser printed at a local copy shop on uncoated paper. Coated paper cracks when draping the flag.
- The paper does not have to be any thicker than normal but does need to be of good quality.
- The laser toner is flexible when folded but not overly so and therefore laser printed flags require some preparation before use.
- Folding, glueing & draping an unprepared flag will result in unsightly cracks in the laser toner artwork revealing the white paper underneath.
- Laser toner's main advantage is that it is much more light stable than the inks used in standard inkjet printers so the flags won't fade.
Tools
- Apart from PVA glue, a sharp knife & straight edge, it's useful to have two thin paint brush handles nearby for draping the flag.
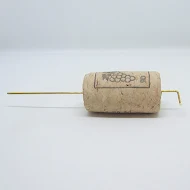
- It is better to work on the flag well away from the figure. I made a 2.5" "dummy" flag pole from 1 mm brass rod set into a wine cork. All folding, glueing and drying stages use this.


My flagging tool (left), the notch in the bottom of the the cork (right).

The brass flag pole with lug (left) & tool in use (right).
Preparation
- Cut out the flag leaving enough backing so that you can hold it without getting your fingers anywhere near the flag itself.
- Next varnish the printed side of the flag using Windsor & Newton Galleria Matt Varnish working the varnish in one direction only.
- The varnish is superb at matting paper flags and it protects the layer of laser toner so that, if handled carefully, the toner won't crack when draped.
- As the varnish is water based you must leave it to dry before cutting the flag out with a sharp fresh blade and a steel ruler.

Edging
- Next it's important to paint the edges but first gently fold the flag in half around the "dummy" flag pole. No not put a sharp crease in the flag.
- To edge the flag dry-brush the edges with the closest colour you can manage and only dry-brush from the inside toward the outside face of the flag.
- For the best results also paint 1-2 mm of the inside edge and around the centre fold to avoid unsightly white edges if the halves of the flag aren't perfectly aligned.
- This process is quick and controllable allowing you to build up the colour gradually and to keep the brush away from the outside face.
Glueing
- Coat almost all the unprinted side of the flag with PVA (white glue) leaving a strip down the hoist (centre) where the flag pole will go.
- Then add a little more glue to one half. This is to allow the two halves to slide across one another and make lining up the edges easier.
- It is important to allow just enough time for some of the water in the glue to soak into the paper as the damp paper will allow you to drape the flag more easily.
- Now quickly wrap the flag round the "dummy" flag pole and line up the edges.
- Smooth out any air bubbles working towards the hoist and gently shape the central area of the flag round the flag pole with your fingers.
- Move the flag up and down the flag pole to loosen any glue that would end up sticking the flag to the "dummy" flag pole.
Draping
- Once the edges are aligned, and the flag is still damp, drape the flag by folding the flag round a paint brush handle. Being right handed I hold the handle behind the flag and fold it away from me.
- Immediately place the second paint brush handle on the opposite side to the first and fold the flag back in the opposite direction.
- This is where the "dummy" flag pole really comes into its own. It's far lighter and much easier to move around than a either a single figure or base of figures.
- The flag should now be in a smooth "S" shape folded around both paint brush handles.
- Remove the paint brush handles to leave two opposing gentle folds in the flag.
- You can create folds using just you fingers if you want but I find the paint brush handles produce much smoother folds and do not pull the aligned edges apart. The latter nearly always happens if the finger folds are too sharp.

Draping a flag (tool & paint brushes held in one hand!).
Final touches
- Leave the flag on the dummy pole to dry thoroughly. The folds will relax slightly but not completely.
- When almost dry check the edges and touch up as required. I find using the side of a brush is best.
- At this stage be very careful to avoid getting paint on the printed flag. It is really hard to match the colour of paint and laser toner.
- Leave for a least an hour to let the paper dry; the flag is well and truly stuck at this stage (hopefully not to the "dummy" flag pole tool).
Raising the colours
- Once thoroughly dry remove the finished flag and dry fit the flag to your model.
- If the fit is tight twist the model so that the flag pole is rotated left and then right inside the new flag whilst gently pushing the flag pole into the flag. It's almost as if you are trying to screw the flag pole into the flag.
- Remove the flag and apply a little PVA to the flag pole before slipping the flag on to its final home.
- The final step is to gently pinch the hoist area of of the flag around the flag pole. This will avoid an unsightly gap between the sides of the flag at the top and bottom of the hoist.

No comments :
Post a Comment